
09: The Great Escape (Part 2)
 Learning Target
- Create an object that can be grabbed by a VR controller
- Create an object that can be pressed, activated or selected by a VR controller
- Create an object that can be moved by a VR controller
- Test and debug interactions in a VR scene
 Resources
Scripts
-
- OutlineOnHover.cs
- Add to an object that is interactable (e.g. Teleport Anchors, Grab Interactables)
- Add a Quick Outline component to the same object
- This script will turn on the Quick Outline when your interactor hovers over it
- VisualButtonPress.cs
- Add to a custom button object with an XR Simple Interactable component
- Configure these Interactable Events:
- Select Entered
- Select Exited
- OutlineOnHover.cs
 Instructions
In this assignment we will learn some of the VR interactions Unity and the XR Interaction Toolkit can already do for you with little to no scripting.
Part 1 – Open and Check Your Milestone 1 Project
Step 1: Open Your Existing Project
Do a quick backup of your existing work before beginning this assignment.
Step 2: Save a New Scene Version
Save your scene with a new name such as:
EscapeRoom_Part2
This helps you keep changes separated in case something happens to your scene.
Step 3: Check That Your XR Setup Still Works
Your scene should still include:
-
- XR Origin (VR Rig)
- XR Interaction Manager
- XR Device Simulator
Run the scene in Play Mode and make sure you can still:
-
- move around
- look around
- teleport (however, this is not required to start this assignment)
If movement or looking around no longer works, fix that before moving on.
Part 2 – Plan Your Interactions
Step 1: Choose 3 Simple Interactions
For this milestone, your room must include at least:
-
- 1 grabbable object
- key, flashlight, book, crate, wrench, lantern, etc
- 1 pressable or selectable object
- light switch, power button, alarm snooze, doorbell, mouse button, etc
- 1 movable object
- door, lid, drawer, valve handle or lever, etc
- 1 grabbable object
These interactions do not need to solve a puzzle yet, though it will benefit you if you start thinking in that direction.
Step 2: Keep the Interactions Simple
Choose interactions that can mostly be built with Unity components and XR Interaction Toolkit components.
Good choices for interactions in this assignment include:
-
- grabbing, carrying, moving, lifting
- pressing, rotating, opening
- placing objects in obvious locations
We will tackle things that depend on custom logic or interactions between objects in the next assignment.
Part 3 – Add a Grabbable Object
Step 1: Create or Choose an Object
Add an object the player should be able to pick up.
Step 2: Make Sure It Has a Collider
Select the object and make sure it has a collider.
-
- Box, sphere and capsule colliders will meet most needs.
- Avoid mesh collider unless necessary. It is more computationally intensive.
Without a collider, the interaction system will not work correctly.
Step 3: Add a Rigidbody
Add a Rigidbody component.
-
- Use Gravity should be checked
- don't make objects extremely heavy
- avoid very small objects
- Be sure to interpolate motion
- Check for continuous dynamic collisions
If you don't set interpolation and collisions correctly, you will probably lose your objects through walls and the floor.
Step 4: Add XR Grab Interactable
Add the XR Grab Interactable component to the object.
This allows the player to grab and move it with the simulated controllers.
Step 5: Place It Somewhere Reasonable
Put the object somewhere the player can easily reach, such as:
-
- on a table
- on a shelf
- on a crate
- on the floor near the player
Do not hide it inside another object.
Step 6: Test the Grab
Run the scene and test the object with the XR Device Simulator.
Make sure the player can:
-
- target it
- pick it up
- move it
- let go of it
If it behaves strangely, check:
-
- collider size
- object scale
- rigidbody settings
- whether its collider is stuck inside another object
Part 4 – Improve Interactions
It can be really hard to tell when you are hovering over an interactable. Let's fix that.
Step 1: Add Outline to Interactables
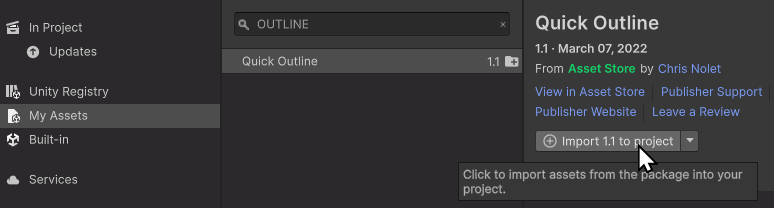
Go to the Package Manager and install the Quick Outline component we used in a prior assignment.
Step 2: Add Script to Activate Outline
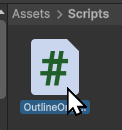
Create a scripts folder in your project assets folder.
Download the OutlineOnHover.cs script and place it in this folder.
Step 3: Add Script to Activate Outline
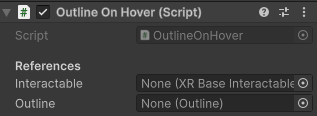
Add both an Outline and an OutlineOnHover component to each of your grabbable objects.
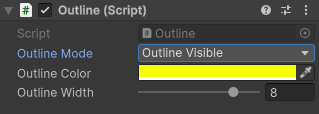
Configure your Outline to look the way you want it to look.
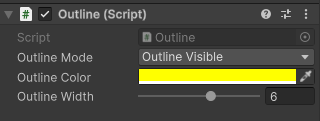
The Outline On Hover component will try to automatically configure itself.
You don't need to add these missing items unless you have a parenting configuration the script doesn't understand.
Step 6: Test the Grab Again
Run the scene and test the interactable objects with the XR Device Simulator.
You should see an outline appear when you hover over an interactable.
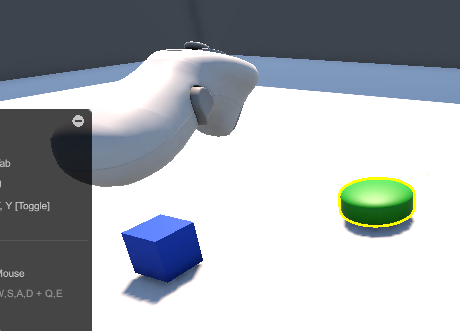
Part 5 – Add a Pressable (Selectable) Object
Step 1: Build a Simple Button or Control
Create a button-like object using simple shapes or a custom object. An example hierarchy:
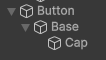
In this example, I used an empty parent, a cube for the base and a capsule for the button cap.
Though they will take a bit more work, you can also create one of these:
-
- a lever
- a switch
- a control panel button
Step 2: Add a Collider
Make sure the part the player interacts with has a collider.
Step 3: Add an Interaction Component
For the easiest version, add this to your button cap:
-
- XR Simple Interactable
This gives you a basic object the player can target and interact with.
Step 4: Make It Easy to Spot
Give your button:
-
- a bright cap color
- a different base material
Then, add the outline and hover script as before.
For this, you may want to change the outline type so the hidden part of the button isn't outlined.
Step 4: Make It Behave Like a Button
Add the VisualButtonPress.cs script to your button.
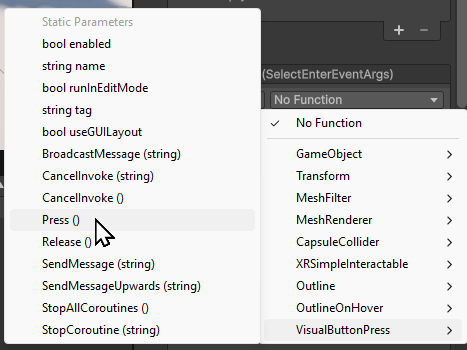
Go to your XR Simple Interactable Component and expand the Interactable Events. Find these events:
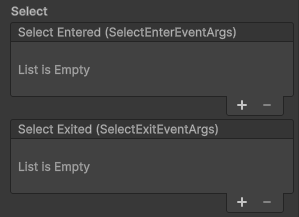
Click the '+' button and drag the object with your VisualButtonPress script into the slot.
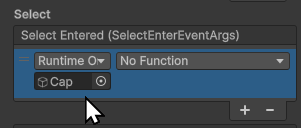
Then, find the function for a button Press in the VisualButtonPress script category.
Repeat for the Select Exited event, but be sure you release the button.
Step 5: Test It
Run the scene and make sure the player can clearly aim at and interact with the button.
For this assignment, the button does not need to cause anything else to happen.
It only needs to work as a basic VR interaction.
Optional Challenge
If you already know how to create a better physical press interaction using built-in XR components, you may do that.
However, a simple selectable button is completely acceptable for this assignment.
Part 6 – Add an Openable or Movable Object
Step 1: Choose a Moving Object
Create one object that the player can move in a believable way.
Good examples:
-
- a small door
- a cabinet door
- a box lid
- a drawer
- a lever
A lid or small cabinet door is often easier than a full-size room door.
Step 2: Build It from Separate Parts
Make sure the moving part is its own object. I suggest grouping the parts of the object under an empty parent.
For example:
-
- a cabinet base as one object
- a cabinet door as another object
- a parent that contains both

This makes it more organized and easier to control movement.
Step 3: Set the Pivot or Movement Direction
Think about how the object should move.
Examples:
-
- a door rotates from one side
- a lid rotates from the back edge
- a drawer moves straight out
- a lever rotates from a fixed point
Set up your object so its movement makes sense.
Step 4: Add the Needed Components
Add a Rigidbody and Collider to each moving object.
Add an XR Grab Interactable to any object you will directly interact with in VR.
Add Hinge or Spring joints to things that require them.
Keep the interactions simple. The goal in this assignment is for the player to directly move the object, not to trigger it through custom code.
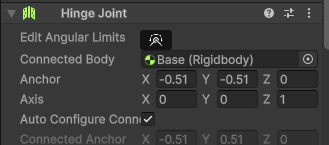
Step 5: Configure Rigidbody and Hinges
Be sure to set the values of your Rigidbody and Hinge Joints to be realistic.
If using a Hinge or Spring joint, you may need to adjust the position of the anchor.
If you want a Hinge tied to another object, then be sure to set the Connected Body property.
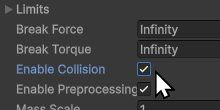
If two parts of a joint will collide with each other, be sure to enable collisions:
Step 6: Test the Motion
Run the scene and test whether the object:
-
- moves the way you expect
- stays in the correct area
- does not fly away
- does not fall through the floor
- looks believable
It is okay if this interaction is not perfect yet.
At this stage, it just needs to function as a basic VR object interaction.
Part 7 – Improve the Scene for VR Interaction
Step 1: Check Scale
Objects in VR need to feel like the correct size.
Make sure:
-
- buttons are not too tiny
- grabbable objects are not too small
- doors, tables, and shelves feel believable
Step 2: Check Reachability
The player should be able to reach important objects without frustration.
Do not place your main interactions:
-
- too high
- too low
- inside walls
- inside other objects
Step 3: Make the Interactive Objects Easy to Notice
The player should be able to tell what can be used.
You can help by using:
-
- better lighting
- brighter colors
- cleaner spacing
- good placement
- less clutter around important objects
Part 8 – Test Everything with Desktop Debugging
Step 1: Use the XR Device Simulator
Just like in Milestone 1, use the simulator to test your scene in Play Mode. Milestone 1 already used the XR Device Simulator specifically so students could test VR behavior without a headset.
Step 2: Verify All Required Interactions
Before you finish, make sure all of these work:
-
- movement
- teleport
- one grabbable object
- one pressable or selectable object
- one movable object
Step 3: Fix Common Problems
Check for these common issues:
-
- missing colliders
- missing rigidbodies
- objects falling through the floor
- objects that are too small
- objects placed out of reach
- interactions that are hard to see
 Grading
| Criteria | Letter Grade |
|---|---|
|
Exceptional
|
A |
|
Good
|
B |
|
Reasonable
|
C |
|
Needs Improvement
|
D |
|
Insufficient
|
F |
| Scores may be rounded to the nearest whole number. | |