
14: Segmenting a LAN
 Learning Target
- Build a larger local area network
- Separate devices into network segments
- Understand how segmentation affects security and network traffic
 Instructions
In this assignment, you will build a larger network and divide it into smaller sections. This is called network segmentation.
A segmented network is easier to manage and safer than putting every device into one large shared network.
In Filius, we will use a separate switch for each segment. When we begin working with physical managed switches, we will be able to segment the network without using separate physical devices for each segment.
Part 1: Build One Large Unsegmented Network
In this first part, you will open the provided Filius starter file and build one large LAN where all devices are connected together.
This represents a simple but risky network design.
Step 1: Open Filius
- Open Filius.
- Download and then open the starter file for this assignment: Filius-Segmented-Network-Starter.fls
- Save this new project into your H: drive so you aren't working from within the Downloads folder.
The file should already include these devices:

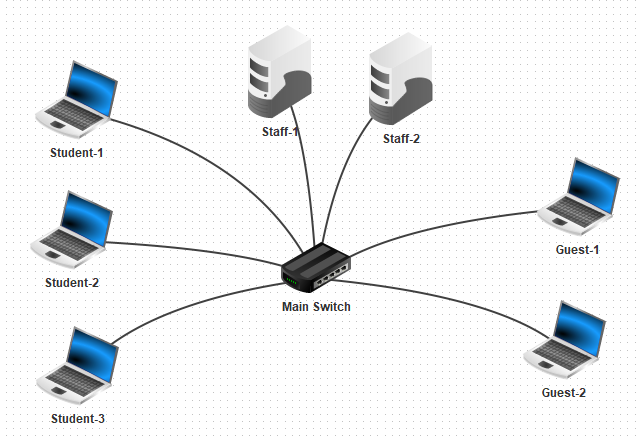
Step 2: Connect the Network
- Add 1 switch to the workspace.
- Name it "Main Switch" and place it near the middle of the network.
- Connect each computer to the switch.
At this point, all devices are part of one local network.
Step 3: Configure the IP addresses
Use this network:
192.168.0.x
Use this subnet mask:
255.255.255.0
Theses computers are already setup with unique IP addresses for you:
Student-1: 192.168.0.10
Student-2: 192.168.0.11
Student-3: 192.168.0.12
You will need to configure the IP addresses of these computers:
Staff-1: 192.168.0.20
Staff-2: 192.168.0.21
Guest-1: 192.168.0.30
Guest-2: 192.168.0.31
Leave the gateways blank for now.
Step 5: Take a Screenshot
Take a screenshot showing your full unsegmented network.
Save this screenshot. You will submit it at the end of the assignment.
Part 2: Test the Unsegmented Network
Since all devices are on the same LAN, they should be able to communicate directly.
Step 1: Start the simulation
Switch to simulation mode.
Install the Command Line application on:
- Student-1
- Staff-1
- Guest-1
Step 2: Test communication
From Student-1, ping:
- Student-2
- Staff-1
- Guest-1
Use the IP addresses, not the device names.
Step 3: Watch the data exchange
- Right-click Student-1.
- Choose Show data exchange.
- Run one of the pings again.
Look for ARP and ICMP messages.
Part 3: Redesign the Network into Segments
Now you will rebuild the network so the devices are separated by purpose.
Instead of putting every device on the same LAN, you will create smaller LANs. Each smaller LAN is a network segment.
For this assignment, we will create these three segments:
- Student Network
- Staff Network
- Guest Network
Step 1: Return to design mode
Switch back to design mode.
You may either modify your existing network or reopen a fresh copy of the starter file.
Step 2: Remove the old switch connections
Remove the cables connected to the Main Switch.
You may also delete the Main Switch.
You will replace it with three smaller network segments.
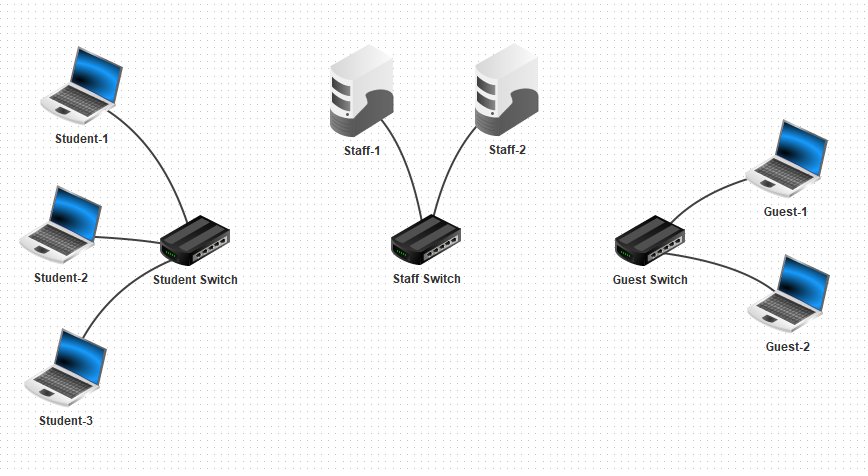
Step 3: Add switches for each segment
Add 3 switches.
- Student Switch
- Staff Switch
- Guest Switch
Step 4: Connect each segment
Connect the devices to the correct switches. Do not connect the switches to each other.
For example:
Step 5: Configure the Student Network
Use this network:
192.168.10.x
Set the devices as follows:
Student-1: 192.168.10.10
Student-2: 192.168.10.11
Student-3: 192.168.10.12
Subnet Mask: 255.255.255.0
Gateway: leave blank
Step 6: Configure the Staff Network
Use this network:
192.168.20.x
Set the devices as follows:
Staff-1: 192.168.20.10
Staff-2: 192.168.20.11
Subnet Mask: 255.255.255.0
Gateway: leave blank
Step 7: Configure the Guest Network
Use this network:
192.168.30.x
Set the devices as follows:
Guest-1: 192.168.30.10
Guest-2: 192.168.30.11
Subnet Mask: 255.255.255.0
Gateway: leave blank
Step 8: Take a Screenshot
Take a screenshot showing your segmented network.
Save this screenshot. You will submit it at the end of the assignment.
Part 4: Test Communication Inside Each Segment
Devices in the same segment should be able to communicate with each other.
Devices in different segments should not be able to communicate yet.
Step 1: Test the Student Network
- From Student-1, ping Student-2.
Step 2: Test the Staff Network
- From Staff-1, ping Staff-2.
Step 3: Test the Guest Network
- From Guest-1, ping Guest-2.
Step 4: Test across segments
- From Student-1, ping Staff-1.
- From Student-1, ping Guest-1.
- From Guest-1, ping Staff-1.
Part 5: Observe Traffic in a Segmented Network
A broadcast domain is the area of a network that receives broadcast messages. ARP is a broadcast message. When a device needs to find another device on the same local network, it sends an ARP broadcast.
Segmentation helps limit how far those broadcasts can travel.
Step 1: Show data exchange for Student-1
Right-click Student-1.
Choose Show data exchange.
Step 2: Ping Student-2
From Student-1, ping Student-2.
Watch the data exchange window.
Look for ARP messages before the ICMP ping messages.
Step 3: Ping Staff-1
From Student-1, ping Staff-1.
Watch the data exchange window.
Step 4: Think about what happened
Answer these questions:
- What happened when Student-1 pinged Student-2? Did ARP appear? Why?
- What happened when Student-1 tried to ping Staff-1? Did ARP appear? Why?
- Why might it be useful to limit broadcast traffic?
Part 6: Add a Router Between Selected Segments
Sometimes, segments need to communicate.
For example, staff may need to reach student devices for classroom management or troubleshooting.
Guest networks often remain isolated from other segments.
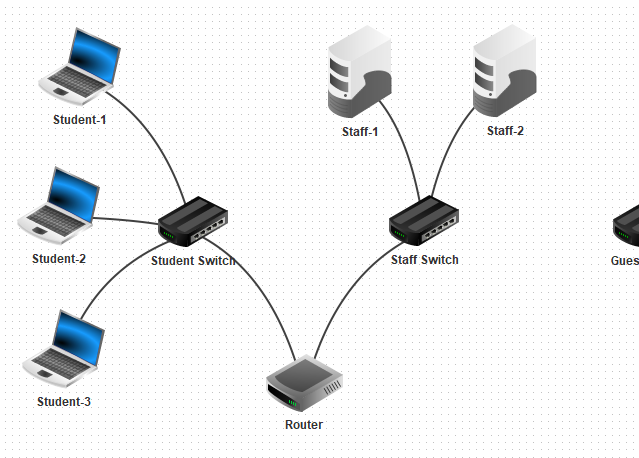
Step 1: Add a router
Return to design mode.
Add a router with 2 network interfaces connected to the Student and Staff network segments.
Step 2: Configure the router interfaces
The router needs one IP address on each network it connects to.
Configure the Student-side router interface:
IP Address: 192.168.10.1
Subnet Mask: 255.255.255.0
Configure the Staff-side router interface:
IP Address: 192.168.20.1
Subnet Mask: 255.255.255.0
Step 3: Configure Student Network gateways
Set the gateway for these devices:
Student-1: 192.168.10.1
Student-2: 192.168.10.1
Student-3: 192.168.10.1
Step 4: Configure Staff Network gateways
Set the gateway for these devices:
Staff-1: 192.168.20.1
Staff-2: 192.168.20.1
Step 5: Leave Guest devices isolated
Do not give Guest-1 or Guest-2 a working gateway.
The Guest Network should remain separated from the other networks.
Step 6: Take a Screenshot
Take a screenshot showing your router connected to the Student and Staff networks.
Save this screenshot. You will submit it at the end of the assignment.
Part 7: Test the Routed Segments
Now you will test whether the router allows selected networks to communicate.
Step 1: Test Student to Staff
From Student-1, ping Staff-1.
Step 2: Test Staff to Student
From Staff-1, ping Student-1.
Step 3: Test Guest to Student
From Guest-1, ping Student-1.
From Guest-1, ping Staff-1.
Step 4: Answer the questions
Answer these questions:
- Which network segments can communicate?
- Which network segments cannot communicate?
Part 8: Final Reflection
Answer these questions in complete sentences:
- How is a segmented network different from one large LAN?
- How does segmentation benefit a network?
- What is one example of a real-world network segment in a school or business?