
11: The Great Escape (Part 4)
 Learning Target
- Add Android Build Support to a Unity installation
- Build and deploy a Unity VR project for a Meta Quest 3S headset
- Identify and debug issues that appear during VR headset use
 Resources
- Older Tutorial: Unity VR Beginner — The Escape Room
- Newer Tutorial: Unity Create with VR — VR Software Setup
 VR Headsets
One headset will be shared amongst 3 students. Only use the headset assigned to your group unless otherwise directed.
Be sure to follow these basic guidelines:
- Pass the headset and cable carefully
- Plug and unplug the headset cable carefully
- Keep headset settings as they are
- If something looks wrong on the headset, stop and ask the teacher
 Instructions
Part 1 — Prepare Unity Hub
Step 1: Close Unity
Before changing Unity modules, save your project and close Unity.
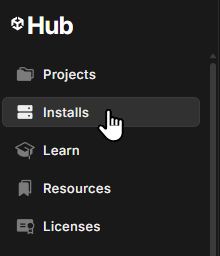
Step 2: Open Unity Hub
Open Unity Hub and find the Installs.
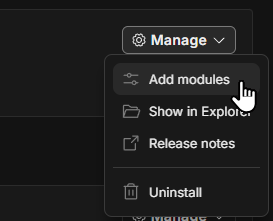
Find the Unity version you are using for this class and click Manage→Add modules.
This will take some time to install. Be sure to start the process near the beginning of the period.
Step 3: Select Android Build Support
Select Android Build Support.
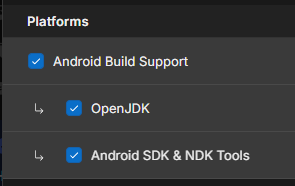
These are needed so Unity can build an Android app for the Quest headset.
Step 4: Install the Modules
Click the Continue button.
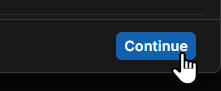
Wait for Unity Hub to finish downloading and installing the modules.
If you are only installing the Android modules, you should be able to work in Unity while it is downloading and installing. You will need to restart Unity to see the updated profiles.
Step 5: Reopen Your Unity Project
After the modules finish installing, open your escape room project again in Unity.
Part 2 — Prepare Your Project
Step 1: Open Your Existing Escape Room Project
Open the Unity project you used for the previous escape room assignments.
Your project should already have:
- A VR room or contained environment
- An XR Origin or VR Rig
- XR Interaction Toolkit setup
- Teleportation or movement
- At least one grabbable object
- At least one pressable or selectable object
- At least one simple puzzle or scripted interaction
Step 2: Make a Backup
Before building to the headset, make a quick backup of your project.
This is important because build settings can sometimes change project configurations.
Step 3: Save a New Scene Version
Save your scene with a new name, such as:
EscapeRoom_QuestBuild
This keeps your headset testing version separate from earlier versions...just in case something happens.
Part 3 — Check Your VR Setup Before Building
Step 1: Test in Play Mode First
Before using the headset, test your project in Unity Play Mode with the XR Device Simulator.
Make sure you can:
- Look around
- Move or teleport
- Aim at interactable objects
- Grab at least one object
- Activate at least one button, switch, object, or puzzle
If it does not work in the simulator, it probably will not work correctly in the headset.
Step 2: Fix Obvious Problems
Check for common problems:
- Objects falling through the floor or each other
- Objects that are too small or out of reach
- Red Console errors
Fix these before building to the headset.
Part 4 — Check Build Support in Unity
Step 1: Open Build Profiles or Build Settings
In Unity, find the Build Profiles (or Build Settings)
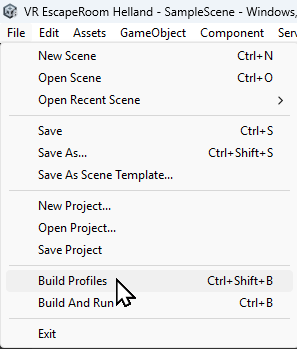
The menu name may depend on your Unity version.
Step 2: Choose Android
Select Android as the build profile.
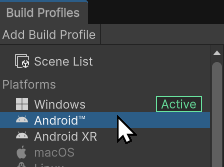
The Quest 3S uses an Android-based build process.
Step 3: Switch Platform
If Android is not already active, click the Switch Platform button.
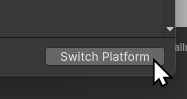
Be patient and wait for Unity to finish switching platforms.
Part 5 — Check XR Settings
Step 1: Open XR Plug-in Management
Open the project settings:
Edit → Project Settings → XR Plug-in Management
Step 2: Check the Android Tab
Click the Android tab. Be sure to check OpenXR.
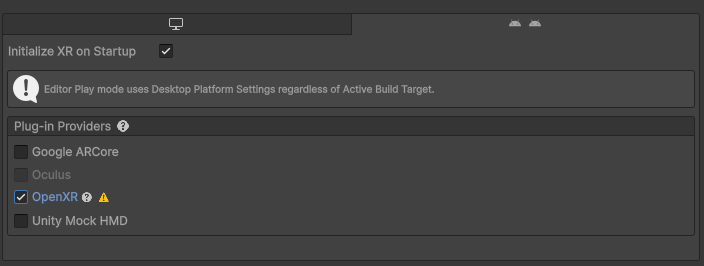
Step 3: Check the Controller Profile
In the Project Settings, find the OpenXR section.

Add an Oculus Touch Controller Profile.

Ask the teacher before changing settings you do not understand.
Part 6 — Connect the Quest 3S Headset
Step 1: Get Your Group’s Headset
Your group of 3 students will share one headset.
Decide the testing order before anyone starts building.
Step 2: Connect the Data Cable
Use the provided USB data cable to connect the Quest 3S headset to the computer.
Be gentle with:
- The headset port
- The computer port
- The cable ends
Step 3: Wait for Unity to Detect the Device
In the Build Profiles or Build Settings window, find the device selection area.
You may need to click Refresh to see a connected device.
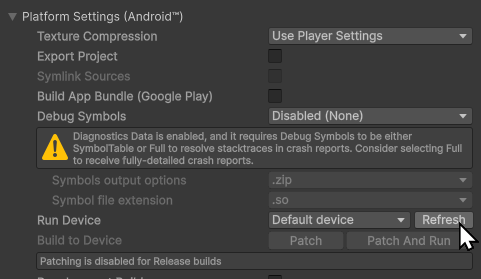
Step 4: Select the Quest Device
Choose the connected Quest headset from the Run Device list.
If no device appears:
- Check that the cable is fully connected
- Make sure the headset is awake
- Try another USB port only if the teacher allows it
- Ask the teacher for help
Do not change headset settings.
Part 7 — Build and Run
Step 1: Start the Build
Click Build and Run. You can do this in the Build Profiles window or from the main menu:

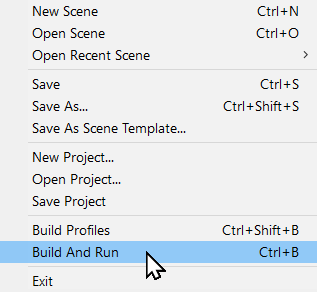
Unity will compile your project and send it to the headset.
This may take several minutes the first time.
Step 2: Save the Build File if Asked
If Unity asks where to save the build, create a new folder named:
BuildQuestVR
Use a clear filename, such as:
YourName_EscapeRoom_QuestBuild.apk
Step 3: Wait for the App to Launch
When the build finishes, the app should open on the headset.
If it does not open automatically, note any errors or unusual behaviors and ask for help.
Part 8 — Test in the Headset
Step 1: Put on the Headset Safely
Use the headset only in the center of the classroom.
- Push tables away to make a safe space
- The other students in your group will be spotters to make sure you remain safe
- Remove the headset if you feel dizzy, get a headache or have unusual sensations
Step 2: Test Basic VR Movement
Check whether you can:
- Look around naturally
- See your scene correctly
- Teleport or move as expected
- Use the controllers
Step 3: Test Your Interactions
Test at least three interactions from your escape room.
Examples:
- Pick up an object
- Press or select a button
- Open or move an object
- Place an object into a puzzle area
- Trigger a light, door, clue, or other result
Step 4: Watch for Differences
Some things may feel different in a real headset than they did in the simulator.
Watch for:
- Objects being too small
- Objects being too far away
- Buttons being hard to aim at
- Teleport pads being hard to target
- Lighting being too dark
- The player starting in the wrong place
- Interactions that worked in the simulator but not in the headset
Part 9 — Group Rotation
Step 1: First Student Tests
The first student connects the headset, builds, uploads, and tests.
The other two students should:
- observe
- watch for problems
- play the game
- provide written feedback
Step 2: Record Notes
For each game that is tested, each student should write down (or type) at least three testing notes. Then, give these notes to the original creator.
Use this format:
Problem 1:
-
-
What I noticed:
-
How I might fix it:
-
Problem 2:
-
-
What I noticed:
-
How I might fix it:
-
Problem 3:
-
-
What I noticed:
-
How I might fix it:
-
Step 3: Pass the Headset
After the first student finishes, carefully pass the headset and cable to the next student.
Repeat the build and test process until all three students have tested.
Part 10 — Improve Your Project After Testing
Step 1: Choose One Problem to Fix
After headset testing, choose at least one issue to improve.
Good fixes include:
- Moving the player start position
- Making a button larger
- Moving an object closer to the player
- Making a teleport anchor easier to see
- Improving lighting
- Making an interactable object more obvious
- Fixing a collider or rigidbody problem
Step 2: Test Again if Time Allows
If your group still has headset time, build and test again.
If not, test your fix with the XR Device Simulator.
Submission
Submit the following:
- Screenshot of your Build Profiles or Build Settings window showing Android selected
- The feedback notes you received from others in your group
- A short explanation of one improvement you made after headset testing
 Grading
| Your submission... | Your grade... |
|---|---|
|
Extended |
A+ |
|
Exceptional |
A |
|
Good |
B |
|
Reasonable |
C |
|
Needs Improvement |
D |
|
Insufficient |
F |
| Scores may be rounded to the nearest whole number. | |