
09: Improving Security and Usability
 Learning Target
- Install PuTTY on a Windows computer
- Generate an SSH key pair
- Enable key-based authentication on the Raspberry Pi
 Resources
- PuTTY Download
 Instructions
In this lab you will install PuTTY, generate a cryptographic SSH key pair, and configure the Raspberry Pi to accept that key for login.
This allows the computer to prove its identity without sending a password across the network.
Important:
Password login will remain enabled so you always have a backup method if something goes wrong.
Part 0: Before You Start
You should already have:
- Ubuntu 22.04 installed on the Raspberry Pi
- Nginx installed and running
- A custom Nginx site config working
- A basic HTML site already showing in the browser
- PHP and MySQL installed
Part 1: Install PuTTY
Step 1: Download PuTTY
Open a web browser on the Windows PC.
Go to:
https://www.chiark.greenend.org.uk/~sgtatham/putty/latest.html
Download this file:
-
-
64-bit x86: putty-64bit-0.xx-installer.msi
-
I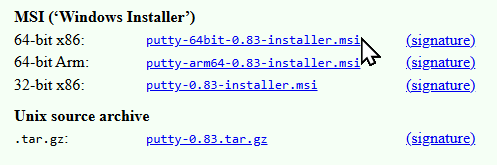
Note: If this site is blocked, you can use the local mirror in resources.
Step 2: Run the installer
-
- Open the downloaded file
- Click Next through the installer
- Accept the default options
- Finish installation
Note: You will likely need an administrative password at some point.
PuTTY installs several programs:
-
- PuTTY (SSH client)
- PuTTYgen (key generator)
Common Pitfalls
-
- Downloading the zip file instead of the installer
- Running PuTTY from inside the zip file without installing
Part 2: Generate an SSH Key Pair
Step 1: Open PuTTYgen
-
-
Click Start
-
Search for PuTTYgen
-
Open the program
-
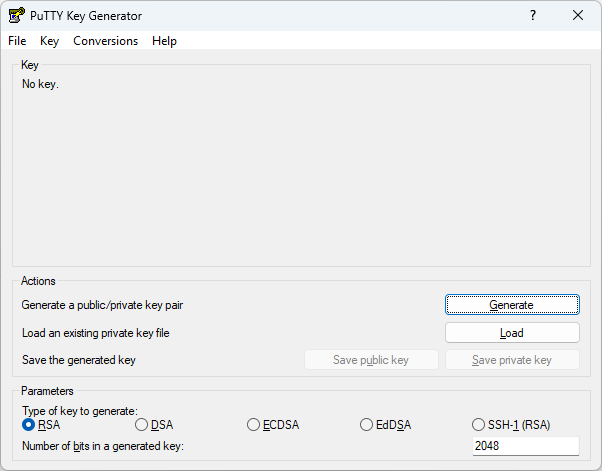
Step 2: Configure the key type
RSA is a widely supported encryption method used to securely identify your computer to the server.
At the bottom of the window select:
-
- Key Type: RSA
- Bits in a generated key: 4096
This is more secure than the defaults.
Step 3: Generate the key
-
- Click Generate
- Move your mouse randomly inside the blank area until the progress bar finishes
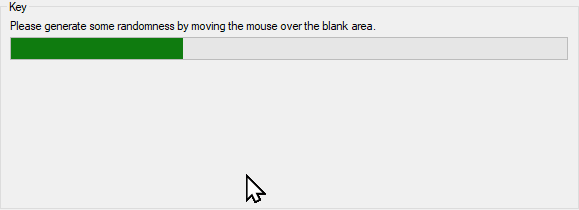
Note: Computers are very predictable machines. Moving the mouse adds unpredictable input that helps create a more secure encryption key that is difficult for others to reproduce.
Step 4: Save the private key
Click Save private key
Save it somewhere easy to find on the Windows PC such as your H: drive.
Example filename: raspberry_pi_key.ppk
When prompted about a passphrase, select Yes to continue without one for this lab.
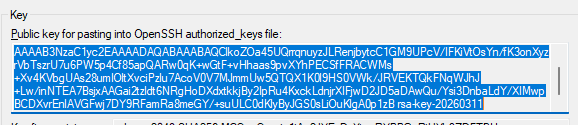
Step 5: Copy the public key
In the PuTTYgen window you will see a large text box labeled "Public key for pasting into OpenSSH authorized_keys file
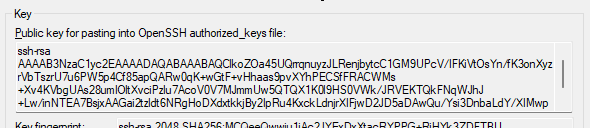
Select and copy the entire key.
Common Pitfalls
-
- Forgetting to save the private key (.ppk file)
- Copying only part of the public key
- Closing PuTTYgen before copying the key
Part 3: Confirm Password Login Works
Before adding the key, confirm that SSH still works normally.
From Windows Terminal run:
ssh username@IP_ADDRESS
Enter your password and be sure you see the Linux command line.
username@hostname:~$
Common Pitfalls
-
- Wrong IP address
- Raspberry Pi is not powered on
- Incorrect username
Part 4: Enable Key-Based Authentication on the Raspberry Pi
Step 1: Create the SSH key folder
mkdir -p ~/.ssh
Step 2: Set correct permissions
chmod 700 ~/.ssh
Step 3: Open the authorized_keys file
nano ~/.ssh/authorized_keys
Step 4: Paste the public key
Paste the key you copied from PuTTYgen. It will be a very long string of random letters, numbers and symbols starting similar to this:
ssh-rsa AAAAB3NzaC1yc2EA....
Save and exit nano:
-
- CTRL + O
- Enter
- CTRL + X
Step 5: Set permissions on the key file
chmod 600 ~/.ssh/authorized_keys
Common Pitfalls
-
- Missing part of the public key
- Extra spaces before the key
- Saving the key in the wrong file
Part 5: Configure PuTTY to Use the Key
Step 1: Open PuTTY
Search for PuTTY in the Start menu.
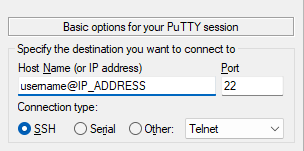
Step 2: Enter connection information
In the Host Name field enter:
username@IP_ADDRESS
Example:
student@192.168.1.42
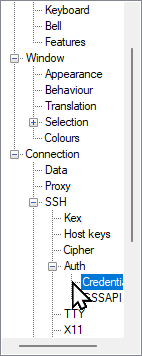
Step 3: Select the private key
In the left panel navigate to:
Connection → SSH → Auth → Credentials
Click Browse
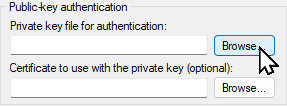
Select the .ppk private key file you saved earlier.
Step 4: Save the session (recommended)
Return to the Session category.
Enter a name such as:
raspberry_pi
Click Save
This allows you to reconnect quickly later.
Part 6: Test Key-Based Login
Click Open.
If everything is configured correctly:
You should log in without typing your Raspberry Pi password.
Common Pitfalls
-
- Wrong private key selected
- Public key copied incorrectly
- Incorrect permissions in the
.sshfolder
Part 7: Confirm Password Login Still Works
For reliability in a classroom environment, password authentication will remain enabled.
Open Windows Terminal and login the old way:
ssh username@IP_ADDRESS
Enter your password.
If this still works, your system now supports both login methods.
Completion Checklist
-
- PuTTY installed on Windows
- SSH key pair generated with PuTTYgen
- Public key added to Raspberry Pi authorized_keys
- PuTTY configured with the private key
- Key-based login works
- Password login still works
Fun Fact
Most production Linux servers disable password logins entirely and require SSH keys. This prevents attackers from guessing or sniffing passwords over the network.