
23EC: Awesome Animation
 Learning Target
- Create a short keyframe animated scene using both a prop or simple object and a rigged humanoid
- Render to a common video format
 Instructions
-
Part I: Keyframe Animation
Step 1: Open Your Rigged Character Project
Open the Blender project from your rigging assignment.
You may use:
- The humanoid character you rigged in the last assignment.
- A corrected version of your rig if your first one had problems.
Test your rig in Pose Mode before continuing.
Make sure:
- The arms can move.
- The legs can move.
- The head or torso can be posed.
- The mesh follows the bones reasonably well.
Save a new copy of your file with a new name, such as:
Animated_Scene_YourName.blend
Step 2: Create or Add an Unrigged Object
Add one unrigged object to your scene that your character will interact with.
Be sure you have a solid plan for how the character will interact with the object when placing it.
Examples:
-
- Box or crate the character will pick up
- Chair the character will turn around
- Door or treasure chest the character must open
- Lamp the character will turn on
- Sword the character will pick up
This object should be important to the scene. It should not just be background decoration.
Your object should have:
-
- A clear location
- A simple material or color
- A starting pose or position
- Enough detail that the viewer can tell what it is
- A specific purpose
Step 3: Pose the Unrigged Object
Before posing the character, place the unrigged object into its starting position.
Examples:
-
- A box tilted on one corner
- A door partly open
- A chair tipped over
- A sword stuck in the ground
- A treasure chest sitting in front of the character
- A floating object hovering above the floor
The object should look intentionally placed or posed.
At Frame 1, add a keyframe for the object (Press the I key with your mouse in the 3D viewport).
Step 4: Animate the Unrigged Object
Animate the unrigged object before animating the character.
Your object's animation should be simple but visible.
Examples:
-
- A box slides across the floor
- A door swings open
- A chest lid opens
- A sword rises from the ground
- A platform moves up
- A chair falls over
- A lamp tips sideways
Use at least two keyframes for the object, but feel free to use more. For example:
-
- Frame 1: starting position
- Frame 60+: ending position
The viewer should be able to clearly see that the object moved. Use at least 60 frames total.
Step 5: Pose the Rigged Humanoid After the Object
After the object has a starting pose and basic animation, pose your rigged humanoid character at their starting pose.
Eventually, the humanoid should interact with the unrigged object above.
Your character pose should include changes to more than one part of the body.
At minimum, pose these:
-
- Head or torso
- One arm
- One leg
Stronger submissions will pose the whole body so the character looks balanced and intentional.
Step 6: Animate the Humanoid Character
Animate the humanoid using Pose Mode.
The goal is not a perfectly realistic animation, so keep it simple at first. The goal is to show that you can use keyframes to create a basic animated action.
Examples:
-
- Character reaches out
- Character turns toward the object
- Character steps back
- Character raises an arm
- Character leans forward
- Character reacts after the object moves
- Character prepares to kick or push the object
Use at least two keyframes for the humanoid, but you will likely need a keyframe or two in the middle as well.
-
- Frame 1: starting pose
- Frame 60+: ending pose
- Insert keyframes between these as needed to achieve your goal
You may add more keyframes if needed.
Step 7: Set Up the Scene
Add enough scene elements to make the animation understandable.
At minimum, include:
-
- A floor or ground plane
- A camera
- At least one light
- Your animated object
- Your rigged humanoid character
Do not spend all your time decorating. The main focus is the animation.
Step 8: Set the Camera View
Position the camera so the viewer can clearly see both:
-
- The inanimate object
- The rigged humanoid character
Before rendering, check that:
-
- The character is visible
- The object is visible
- The animation happens inside the camera view
- The scene is not too dark
- The camera is not too far away
Part II: Rendering Your Video in Blender 4.5 LTS
You will render your animation as a short video file.
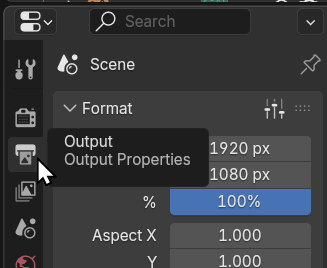
Step 9: Set the Animation Length and Resolution
Find the Output Properties in Blender:
Recommended settings:
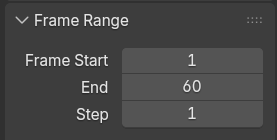
A short, clear animation is better than a long, poorly-designed one.
Also, adjust your Resolution % so it renders faster while you are testing:

You can change this back to 100% when you have your final product.
Step 10: Set the Video Output Location
Find the Output section.
Choose where your video will be saved.
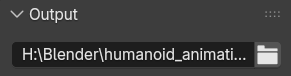
Use a clear file name like the one above or:
Animated_Scene_YourName.mkv
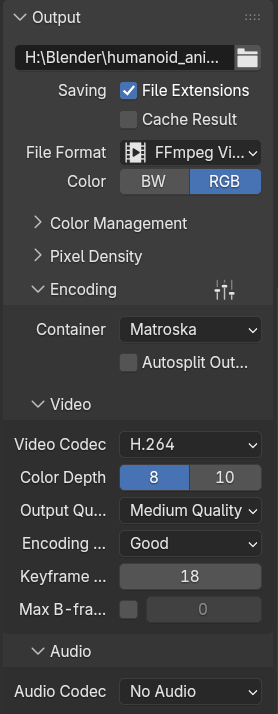
Step 11: Set the File Format to FFmpeg Video
In Output Properties, find the File Format and also expand the Encoding section.
Your video settings should be:
-
- File Format:
FFmpeg Video - Container:
Matroska - Video Codec:
H.264
- File Format:
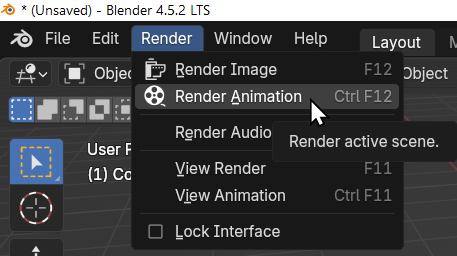
Step 12: Render the Animation
Render your animation from the main menu (or by pressing CTRL+F12):
Wait until the render finishes. This could take some time.
Do not close Blender while it is rendering.
When it is done, go to the folder you selected in the Output section and check that the video file was created.
Step 13: Watch Your Video Before Submitting
Double-click your rendered video file and watch it.
Check for these problems:
-
- The object does not move
- The character does not move
- The object or character moves off screen
- The animation is too fast to understand
- The scene is too dark
- The camera does not show the important action
- The video file did not render correctly
Fix any major problems before submitting.